If it is your goal to get organized, specifically your coupons this year, check out this blog! Kelleigh has made the most beautiful envelops for her cash system and coupons.
There are many different ways to organize your coupons. I personally use the binder method. But, many people use an envelope system. They pull out the coupons they need for a specific sale or store and keep them in an envelope in their car or purse.
You know what’s so cool? Kelleigh isn’t selling her envelope system (though I really think she ought to!), instead she generously posted the complete tutorial and template here so you can create your own. (Thanks Money Saving Mom.)
Check back on Monday, I am going to break down my coupon binder for you. Show you what all my tabs are and list all the best, and cheapest places to find all the items you will need to make your own binder! Plus, I will be giving one away…
Tutorial for the "Envelope System"
By tiffany Leave a Comment By clicking on our links, we might make a SMALL commission - Thanks for the support! See our full DISCLOSURE here.
Easy Easter Craft-Bunny
By tiffany Leave a Comment By clicking on our links, we might make a SMALL commission - Thanks for the support! See our full DISCLOSURE here.
 Take a cheap hand towel, I like white. The cheaper and thinner the better. They have them in packs at Wal-Mart for like 10 for $6
 Fold one corner up like you are making a bandana.
 Keep folding…
 When it is all rolled up, fold it in half.
 Next, now this is the hardest part, take the open ends (the ears) and fold it back almost half way. This is making the bunny face and ears.
 Take a rubber band and secure the little face of the bunny. I had to use a hair tie because I used a heavier wash cloth, the thinner clothes can be done with a rubber band. Twist it around a few times so it is tight. Now pull the ears up a bit, and your done!
 Tie a ribbon around the rubber band so you can’t see it.
 If I had all the supplies I usually give him some googly eyes, a little pompom nose and a little pompom tail. But I didn’t want to pull out the glue gun. I think he is cute as it!
 I stick a plastic egg in the little hole behind his ears, it is a perfect spot to hold something. I am using these as name sign for Easter dinner. I am putting everyones names on the eggs and putting a bunny by every plate.
  They are cute and less than $1 each to make. Can you beat the 23 second record??
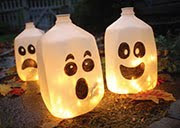
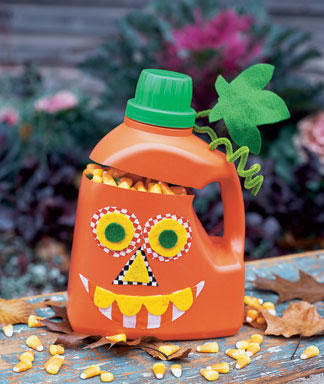
 Easy Halloween crafts!
By Tiffany Leave a Comment By clicking on our links, we might make a SMALL commission - Thanks for the support! See our full DISCLOSURE here.
Capri Sun Bag
By Tiffany 8 Comments By clicking on our links, we might make a SMALL commission - Thanks for the support! See our full DISCLOSURE here.
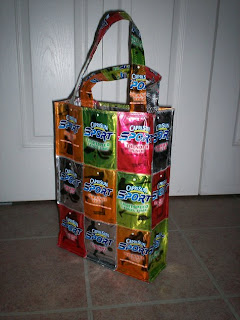 This one is very fancy also.
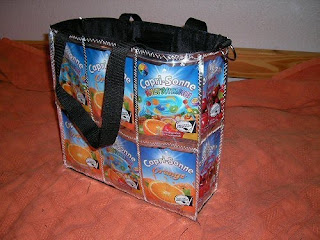 Have you ever made these? I want to learn, anyone want to teach me?
Supplies:
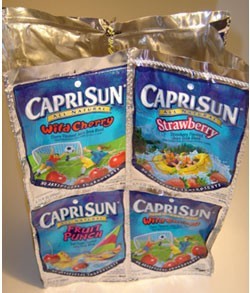
- 14 Caprisun or Kool-aid Jammer juice pouches
- X-acto knife
- Eyelets and Eyelet pliers (can be found at your local craft store)
- Sewing machine and thread
- Scissors
Preparation:
After the juice has been drank use an x-acto knife to slit the bottom of the juice pouch.
Clean the inside of each pouch with hot soapy water and let dry.
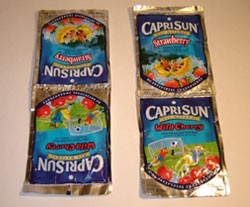 The Front and Back:
Take four juice pouches and sew them together 2 by 2.
Do the same with four more juice pouches, having two sets of four. These are the front and back of the bag.
The Sides:
Sew two juice pouches together, one above the other, two tall one wide.
Do the same to two more juice pouches, have two sets of two. These are the sides of the bag
The Bottom:
For the bottom of the bag you will need to determine how long it will need to be by taking two juice pouches and laying them next to shorter side of the set of four juice pouches. Instead of having one juice pouch full size and having a small part of another showing for the bottom I laid them on top of each other and sewed down the middle of them both to make it the appropriate length. Then I cut off the extra bit, leaving approximately and 1/2″, then sewed that end down flat.
Putting It All Together:
The next step is to sew the bottom to one of the sets of four.
Once you have done that sew the other set of four to the other side.
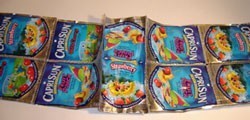
Next sew one of the sets of two to the bottom, then the other.
Now sew all the ends together, the front to the sides and the back to the sides.
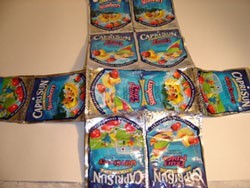
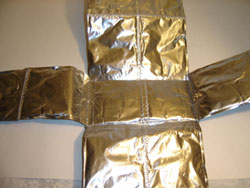
Finishing
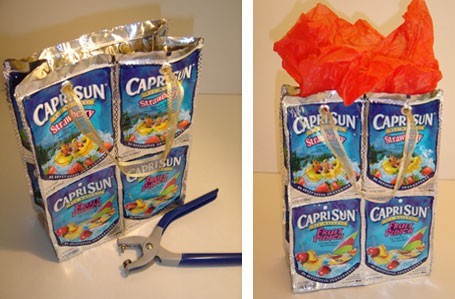
Punch two holes slightly smaller than your eyelet about 3-4 inches apart on the front and the same on the back side of the bag, four total.
Place your eyelets and secure them with the pliers.
Find some yarn, string, ribbon or raffia to make the handles on your gift bag, be sure to make the knot big enough on each end so that the handles do not get pulled out through the eyelets.
About The Author: Stella contributes craft ideas to ThriftyFun.com. If you have any craft ideas that you would like to share with Stella and ThriftyFun community, please submit them here.
School Lunch Ideas!
By Tiffany 5 Comments By clicking on our links, we might make a SMALL commission - Thanks for the support! See our full DISCLOSURE here.
Altered art clip board and notebook set ~ Mini Giveaway!
By Tiffany 29 Comments By clicking on our links, we might make a SMALL commission - Thanks for the support! See our full DISCLOSURE here.
I did the same for the back and front of the clip board. I used a coordinating paper for the backs of the clip boards.
Next, I glued the paper to the notebook covers.
For the front of the clipboard I made a template so I could cut around the clip part and fit the paper in nicely.
It was late and I thought I had modge podge (I spelled that wrong didn’t I?) but I was out. So I watered down white Elmer’s glue and it worked perfectly.
Look how cool these turned out!
By tiffany 8 Comments By clicking on our links, we might make a SMALL commission - Thanks for the support! See our full DISCLOSURE here.
Free Kool-aid and Fun things to do with kids and kool-aid!
By Tiffany 3 Comments By clicking on our links, we might make a SMALL commission - Thanks for the support! See our full DISCLOSURE here.
Go here to print a coupon for $0.50/10 packets of Kool-Aid. These are on sale at most Kroger stores this week for $0.10 each so if your store doubles coupons, you’ll get these free after coupons. Plus, you can use your browser’s back button to print another coupon for a total of 20 packets free!
I must have about 100 packs of kool-aid in my food storage, and so far I have not paid for any of them. What am I going to do with all this kool-aid you ask???
1. Make Easy, Flavorful Kool-Aid Frosting I discovered this unusual use for Kool-Aid powder when I had a can of vanilla frosting one day and a cherry chip cake to frost. I stirred in a package of cherry flavored Kool-Aid and the result was a delicious, creamy topping that everyone loved! If you need to make a tasty frosting for a gelatin cake, all you need to do is fold in a pack of Kool-Aid into a container of thawed Cool Whip®. If the frosting tastes a little tart, add in sugar, a little at a time until it tastes good to you.
2. Make Kool-Aid Brand Lip Gloss This is an unusual use the girls will love! All they need to do, to make a fruity lip gloss, is to place a small amount of petroleum jelly into a microwave-safe bowl. Stir some Kool-Aid soft drink powder into the jelly- enough to make it the color they desire. Stir in a little sugar, then, place the bowl in a microwave oven for about five or six seconds- just enough to soften the mixture up a bit.
3. Make Sand Art With Kool-Aid Brand Soft Drink Mix Kool-Aid is perfect for the kids to make safe Sand Art with! All you need to do is provide them with plenty of paper and pencils. After they draw pictures on the paper, give them several different colors of dry Kool-Aid and Elmer’s® Glue. Then, instruct them to spread a thin layer of glue over one item in their picture. It’s better to start at the top of the pictures so they don’t get their arms in the wet mixture. They can then sprinkle Kool-Aid on that area and press it down gently. After the kids shake the excess soft drink powder off, they can continue onto the next section. Once their pictures are done, let them set until the Elmer’s Glue dries completely.
4. Temporarily Dye Your Hair With Kool-Aid If you’re going to a party, or, you just want a new look for a short period of time, use Kool-Aid! Choose the color you want to use and pour it into a glass container. Add a teaspoon of corn starch and just enough water to turn the ingredients into a paste. Apply the paste to your clean, dry hair and let it set for five minutes. Then, rinse the paste out. Your “new do” will last until you shampoo your hair once or twice.
5. Make Eerie Party Decorations Another unusual use for Kool-Aid Brand Soft Drink Powder is to make an eerie Halloween decoration with it. Just place some dry ice- don’t touch it with your hands!- into a glass, and pour a packet of any flavor Kool-Aid into it. Kids will watch with fascination as the dry ice and Kool-Aid bubbles and mists. Make up several of these glasses and set them around for an eerie effect at your next party!
6. Make Kool-Aid Clay for the Kids You may already know how to make homemade clay for your kids to play with. But, did you know you can make clay using Kool-Aid brand soft drink powder as well? Mix together a cup of white flour, a fourth cup of salt, 2 tablespoons cream of tartar and a package of Kool-Aid in a pan. Stir in a cup of water and a tablespoon of vegetable oil and heat the pan over medium heat on your stovetop. After several minutes, the mixture should clump together in the pan. When it does, remove the pan from the stove and let it cool slightly until you can touch it. Knead the Kool-Aid clay with your hands until it’s not lumpy anymore. Place it in an airtight container and store it in the refrigerator until use.
7. Heather, left a comment on another use! “Great ideas! You can also tie-dye 100% cotton with Kool-aid.”
3 Ideas to keep the kids busy!
By Tiffany 2 Comments By clicking on our links, we might make a SMALL commission - Thanks for the support! See our full DISCLOSURE here.
Blanket forts, remember these? Don’t forget about them! This beautiful fort in my playroom was worked on by 5 of my children. It kept them occupied for 6 hours, the best part? There was no fighting for 5 hours and 58 min of that! They worked so hard and drug so much stuff out, but it was worth it. They had a blast. At one point it was a restaurant, they were taking food orders. It was a movie theater and a bear cave. I forget to let them do this kind of stuff!
Ah, Chic-fil-A! I will not live anywhere there is not a Chic-fil-A I am completely addicted to their diet lemonade…. Last summer they had a special that if you dressed like a cow you got a free meal, including dessert and drink. I made this little deal last 2 days! I told the kids about it on Tuesday, we brainstormed ideas for the cheapest way to “dress like a cow, head to toe”. That whole day we worked on our costumes. They all dressed in black and white, we cut out ‘cow’ spots and taped them all over them. We printed off a Chic-fil-A signs and taped it to the front of them. Then we made paper plate masks for their faces. We worked on it all day and the kids had a blast, I also spent no money on it!
Teacher's Gift Idea
By tiffany 10 Comments By clicking on our links, we might make a SMALL commission - Thanks for the support! See our full DISCLOSURE here.
Twelve hours later when it came out of the kiln, I planted a little herb garden with basil, rosemary and cilantro.
I wish I would have made these for Mother’s Day for the Grandmother’s, they turned out really cute and are something a little useful. I obviously would have used my kids handprints, maybe the dog and cats if I could have held them down 🙂
Drug Store Deals
CVS: Arm & Hammer Laundry Detergent As Low As $2.42 Starting Sunday 2/16
FREE 8 x10 Photo Print At Walgreens
Walgreen’s Photo 11″x14″ Wood Hanger Board Print 75% OFF ~ Limited Time Offer
Walgreens Photo Deals ~ 75% Off Everything For The Wall Sale ~ Valentine’s Day
HOT! FREE 8×10 Photo Print At Walgreens
Kroger Deals
50% Off Halloween Candy ~ Kroger 3-Day Digital Coupon Sale!
Kroger: Friday Freebie! FREE YQ or GoodBelly Probiotics Yogurt + 2 Days of 5X Digital Deals
Kroger: Snag 2 Days of Digital Deals 9/27 to 9/28
Today Only! Score 50% Off Halloween Candy Jumbo Bags at Kroger from $2.50!
Kroger: Snag 2 Days of Digital Deals 9/21 to 9/22
Latest Freebies
Walgreens Photo: FREE 8X10 Photo Print + FREE In-Store Pickup
Free 3-Pack of Donuts w/ Krispy Kreme $25 Gift Card Purchase In-Store
200+ Free Food And Discount Deals On Your Birthday!
Enter For Your Chance To Win The #Love1800Flowers Giveaway
FREE Dr. Seuss’s Birthday Kids Event at Target on 2/29
Local Deals
Register Now! Free Kids Home Depot Workshop For Saturday, January 4th
Register Now! Free Kids Home Depot Workshop For November 30th
Back to School Tax Free Shopping Dates By State for 2019
Register Now! Free Kids Home Depot Workshop For August 8th
Kids Eat Free (Or Almost Free) At These Restaurants 2019
Meet My Litter
Baseball Star Dude
 Part comedian, part Dad, part athlete. He will boss around your children while they play ball.
Baby Sitter Doll!
 Just as angelic as she looks, this girl could easily raise a Village by herself, and all the children would grow up to be President.
Webkinz Pup!
 Self proclaimed, she would be a webkinz dog. Because, "they're cute, and puppies are too. And they're sweet and they always get along with other puppies."
Princess
 This mini-Martha Stewart can handle ANY craft you send her way. She isn't all bows and rainbows, she's got karate kid moves!
Pick-Me-Up
 Not "Pick-Me-Up" like caffeine, she wants you to pick her up! AND NOW!
Supercute Destroyer
 Anything that can be destroyed WILL be destroyed!
Mary Poppins
 Practically Perfect in Every Way for now! Nicknamed "The Panda" she is rolly polly and lives by the motto, "the little one, is KING!"
Miller Dog
 The resident Labradoodle, Miller got his name because Mom won and got to name the baby! Need something chewed up? He'll take care of it. Especially if it's expensive..


